HD (also SD) cutting and transcoding
Tools
Cutting
Encoding method 1
(deprecated)
Encoding method 2
(Virtualdub)
Encoding method 3 (Xvid4PSP, preferred for convenient multi file encoding)
MKV as target container
BluRay making
Here we explore several ways of filtering and
encoding HD video, including means for logo removal. For simpler tasks
like bulk video recompression of TV recordings, there is a more
convenient way, using Xvid4PSP, described in detail on a separate page.
VirtualDub cannot
deal with HD .ts or .mts streams (it may open them but crashes later
on). But
if you remultiplex them to .mkv format (with a tool named MKVtoolnix),
Virtualdub opens them (with fccHandler's plugins, see below), allows
all kinds of filtering, even cutting, and
can either save
the result to a
.avi file - including a re-encoding of the HD video -, or frameserve
to other applications for encoding (which is only a tiny bit more
complicated and .yields more compatible results, e.g., for BluRay
making).
This method not only
makes available some excellent filters (e,g., X-logo, temporal
smoother), it is also easy to configure, and the
fccHandler plugins also parse/index the input files, which avoids crashes due to stream errors often encountered in DVB
recordings.
The tools we need to do all this are:
VirtualDub version 1.10.2 or higher or, even much better, VirtualDub2
fccHandler's plugins for VirtualDub; enabling VD to open many video formats including mpg, mkv.
x264 is the encoder of choice for HD. The Directshow version is command-line only, but there are GUI frontends helping out.
x264vfw (this is the vfw version of x264. It is not further developed because of some restrictions in vfw; nevertheless this last official version works perfectly, and it allows to do almost everything directly in VirtualDub, if you don't mind possible compatibility issues with the output generated. There is a later, unofficial version, but its user interface is very complicated (for expert use only).
MeGui Is a frontend for x264 (included). Can generate mkv files directly and has several useful presets.
x264GUI - a basic GUI for x264, but really sufficient, as all GUIs out there have one or the other issue where you want to modify the command string they generate for x264.
AVIsynth. A video processor that is controlled by script files (.avs). Here we may need it to adapt VitualDub's frameserver to the x264 HD video encoder.
MKVtoolnix can convert .ts and .MTS files to .mkv, which can be opened with VirtualDub if fccHandler's plugin is installed. Also multiplexes streams from one or more sources into an mkv file. Install the portable version to disk and make a link to mmg.exe.
MKVextractGUI can demultiplex .mkv files. Must be version 2 or later.
TSmuxeR. Among other functions, it also has an option to generate simple Bluray structures.
BeLight (a GUI for BeSweet) provides for easy transcoding between various sound formats.
Haali
MKV splitter; enables playing of mkv files. Also provides a
tray app
that allows selecting audio streams and chapters in Media Player.
AC3 filter and AC3file. Often necessary to play or decode AC3 sound. Many HD transmissions contain AC3.
Update: installing the Shark advanced codecs pack appears to be a better alternative to the above two. It contains MKV and AC3 componemts as well as many others, and adding system functions such as thumbnails for MKV.
X-logo for HD. This is an HD adaptation of the best de-logo filter available. Can remove distracting station logos from your TV recordings.
Recommended: Windows7; it comes with quite good built-in MPEG2 and h.264 decoders (maybe not the starter version). Especially useful if you want to use the built-in graphics of newer Intel CPUs (including atoms) for video acceleration. Many 'features' of Windows7 are a pain in the ass, but for video it is good, and alas, you have to go for it tho unleash all functions of current hardware anyway. Some hints on Windows7 you'll find here.
Very
helpful: Smart
Cutter. A bit stiff in price, but for simple TV
transmission ad cutting even the test version suffices, as it only
inserts very short "Demo" logos at cuts. The main advantages: it
preserves all streams, e.g., multi audio, and it cuts frame accurate.
Works for HD and also for SD (MPEG2) streams. You need to save all recordngs (even SD) in transport stream format (.ts or .mts) for use with SmartCutter. Best use this for cutting, before further operations with
VirtualDub.
Note: with cuts done with versions in the 1.5x range, I got some
BSOD crashes when trying to play with Window's HD decoder on an ATI
card. 1.39f worked. Solution: update the ATI drivers to Version 12.8.
Recent
versions of SmartCutter (currently tested up to 1.93) showed a habit of
purging all cuts except of the firstn one, although the status window
pretended to write all cuts (and even the time for writing them was
used).
--> use version 1.67, it appears to be reliable.
- Cut the .ts with Smart Cutter if you want a quick frame-accurate cut or if you want to keep several audio streams.
- For HD, Convert the (cut or uncut) ts to .mkv with MKVtoolnix
(mm.exe, just open the ts file and run. Do not add chapters to the mkv at this point, or VirtualDub will have
problems opening the file.
Use a current version of MKVtoolnix (e.g., 7.60). Old versions were buggy!
- For SD content, with MPEG2 video, we need
anpther format, because the Virtualdub plugins available cannot deal
with mpeg2 video in a .ts stram. Here,, conver the cut .ts to .mpg,
using PVAstrumento. It makes .mpg if you choose the "ps" (program
stream) option.
- Open the mkv (or mpg) file with VirtualDub.
- Some
mkv files may cause the file parser to quit before the file
really ends (this also happens if the mkv file contains
chapters). Completely de-multiplexing the file with MKVextract and
then
re-multiplexing with MKVtoolnix can fix this. A likely better
approach is to de-multiplex the cut .ts file and the remultiplex with
MKVtoolnix. Always play the resulting files and check if the
audio is still synchronous. In
very stubborn cases (VirtualDub still doesn`t open the entire file),
demultiplexing, cleaning the audio streams before remultiplexing may
help (click here for more).
- With any formats and procedures, always
keep the original cut .ts file until the entire re-encoding etc. went
well: ts streams from tv recordings may contain exotic errors that lead
to almost unbelievable kinds of mess.
- In VirtualDub, apply Filters ((de-Logo, (de-)interlacing, resizing etc.) as you like. Some procedures here. Also notice the new X-logo adaptation for HD.
- You can now also cut the video with VirtualDub and save the result as an avi file, either by direct stream copy (in this case, the cuts are accurate to the next I-frame only) or with full processing mode, re-encoding the video. In either case, you can only get one audio stream in the output file. You can select one in the audio settings.
- But there are more choices: encoding (recompressing) directly in Virtualdub (which produces non-standrd files that play but are almost impossible to re-package later on), or, frameserving to an external application for standard compliant encoding.
- If you convert to SD and want to encode to MPEG2, you may want to frameserve to an mpeg encoder. Look here.
- The best (standard-compliant) encoding method for HD is described further below ("Method 2"). This will also be the more modern choice for SD, offering better compression; at least if all your players support it.
- For a quick-and-dirty HD, just read on ("Method 1").
- Here we encode directly in Virtualdub; disadvantage: output is avi, this may affect the compatibility of the steams contained even if converted into an mkv container afterwards.
- For video compression (full processing mode, re-encoding the file), select x264
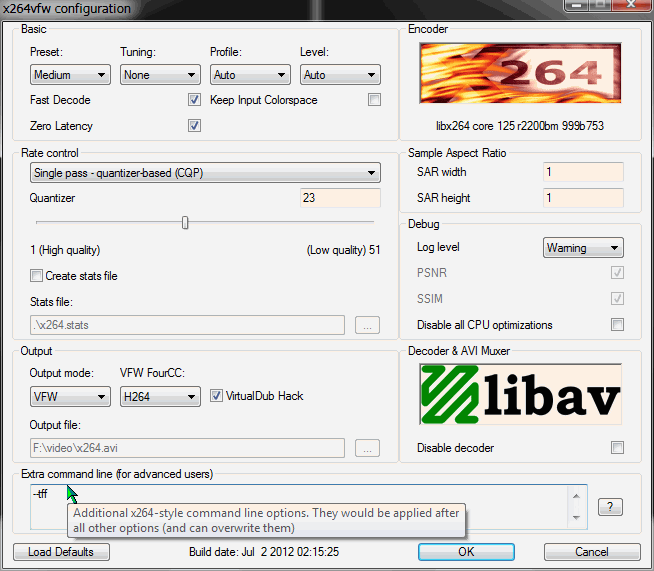
The settings shown are good for almost anything. Some hints:
- The --tff extra command (notice it begins with two "-" ) is only necessary for interlaced video (better do not use it if you have progressive recordings).
- Preset "medium" delivers about perfect quality when re-encoding tv. "Ultra fast" for example, is 3-4 times faster, but faint resilient patterns may occur in very dark or low-contrast image parts (probably only an expert would notice them).
- Fast decode and zero latency serve for smoother playback in many cases, cost about 20% larger files. With nowaday's harddisk capacities, this should be acceptable. Fastdecode also seems to be mandatory for interlacing+CQ, (otherwise the encoder sends a warning message).
- For audio, use direct stream copy; there is no point to re-encoding audio.
- "Save as" AVI to start processing.
- You may now just play the .avi file if you like.
- You may also remultiplex into into a new mkv file and even enhance it with chapter marks
- BluRay cannot be made from files with this encoding method (the tools choke at the avi format)..
Note: you can now directly make x.264 mkv with Virtualdub2, including audio, so much of the following can be omitted. AVIdemux (2.7.6 (32bit) and 2.7.8 (64bit)) also has become a useful alternative.
Overview: again we use Virtualdub for filtering, de-logo etc.. Then, however, we frameserve from VirtualDub to an external x264 version (here we use one with a GUI: x264GUI; MEgui would even be more comfortable but fails to open the frameserving as set up below).
This works rather similar to the process for SD/mpeg2 encoding. suggested here.
We start with the same initial procedures as with Method1, cutting the ts file with Smart Cutter if necessary, then transmultiplexing the ts to an mkv with MKVtoolnix (or to mpg with PVAstrumento if it is SD/mpeg2), then opening the file with VirtualDub and applying any filters desired, such as x-logo, resize etc....
- always set VirtualDub to video - full processing mode and compression method - uncompressed for this.
- always set audio to "no audio" with this method.
- start the frameserver (from Virtualdub's File menu) and give it any name (doesn't matter)
- save the signpost with a name of your choice; let's assume we use "video.avi" (any name OK, but it is important to use the .avi extension instead of the defailt .vdr).
- Open the "video.avi" with x264Gui.
ConvertToYV12 (Videoclip)
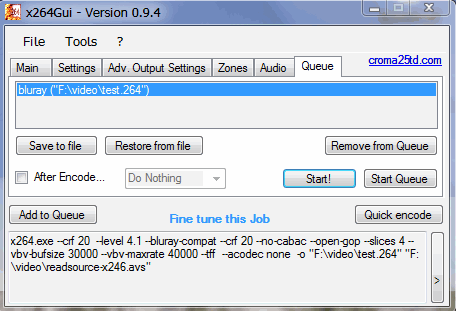
- The custom settings string for this is "--level 4.1 --bluray-compat --tune fastdecode --no-cabac --open-gop --slices 4 --vbv-bufsize 30000 --vbv-maxrate 40000 --tff " . Simply cut and paste the string into the x264Gui profiles editing window ("file - edit settings") from your browser window. The other settings we need (crf (Q value), input and output file names) have to be provided by the GUI controls. Note that the above screenshot lacks the "--tune fastdecode" setting.
- Note that all settings begin with two hyphens (--).
- The --tff is only necessary for interlaced sources (interlaced tv is tff, encoding old DV tapes would need "--bff").
- SD video is often anamorphic. In this case we have to add an 'sar' command which specifies the pixel aspect ratio.
- with 16:9 encoded as 720x576 or 720x480 or 640x480 pixels we need.
- --sar 64:45 for 720x576
- --sar 32:27 for 720x480
- --sar 4:3 for 640x480
- with 4:3 encoded as 720x576 or 720x480 pixels we need.
- --sar 16:15 for 720x576
- --sar 9:8 for 720x480
- for 640x480, an sar command is not required (sar is 1:1)
If you don't want to produce plastic garbage and instead want to record your films to a harddisk, much simpler presets can be used. For example:
- --preset fast --tune film for quick but good HD encoding
- --preset medium --tune film --sar64:45 for a bit more careful SD ebcoding and ananmorphous 16:9 format
- --preset medium --tune film --tff for interlaced encoding
The new .264 video file and the original mkv file (audio streams of it) can now be remultiplexed into a new mkv file (described next) and even enhanced with chapter marks or we can, e.g., make a BluRay disk of it.
MKV as target container
- We use MKVtoolnix..
- At this point, you can reinsert audio streams. You may even want to use this after method 1: although VirtualDub can pass through some audio formats to an avi file, it omits certain informations (language etc.) from the audio stream (MKVtoolnix allows you to add at least the language information again, manually).
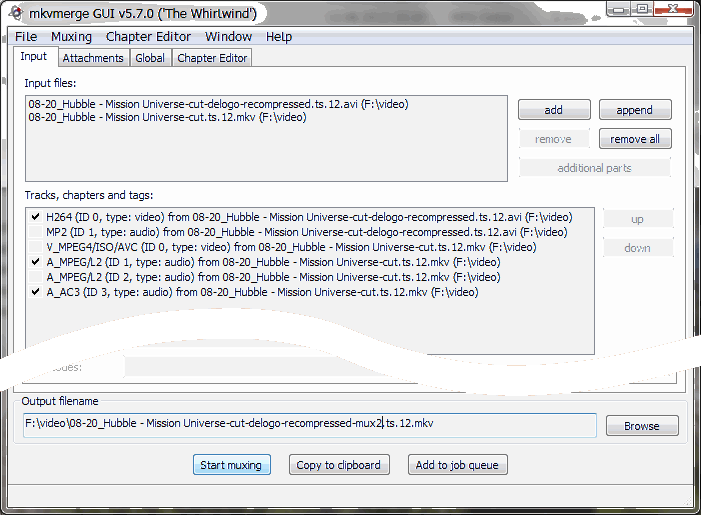
- First drag and drop the new compressed avi or mkv to MKVmerge.
- Select only the compressed video stream from the compressed file (by marking the checkboxes).
- Now drag and drop the original mkv or ts file to MKVmerge (or, in case, the seaparate, cleaned audio straems).
- Select audio streams as you like, from the original uncompressed fiile (in the above example, an mpeg2 and an ac3 stream).
- If you didn't do this before, you should go to the Fle menu, Options and disable "header removal compression" in the "mmg options" tab: this is a feature that saves ony a few bytes but may cause standalone players to reject the mkv created (as stated in a player review on Amazon). (With newer MKVtoolnix versions this is off anyway)
- Now you may also add chapter marks, although this is of little use and I would not recommend it (see below).
- Start muxing and you should get a fairly clean mkv file with synchronous sound.
- Yet, there may be issues. The resulting MKV files may sometimes be faulty for no obvious reasons (mostly with older MKVtoolnix versions), so we need to check them. Read on.
Sometimes the encoding or multiplexing result may be faulty: files may
stop to play at some point,, or lose sync, etc.
Often this is caused by stream errors in antenna or satellite TV
recordings. Many of these are related to audio. Audio errors
can be mended by demultiplexing and treating the audio with a
repair tool.
Other errors are related to the multiplexing itself. Older MKVtoolnix versions sometimes
produced faulty files. I even experienced some seconds of another,
formerly deleted (!!) video file inserted into the file multiplexed.
Repeating the very same multiplexing very often makes the error
disappear. This is absolutely weird and appears to be an problem with
elementary file system handling. As MKVtoolnix appears to be developed
under Linux, it could have been a bug in an NTFS file system driver. I cannot
say which specific program versions had the error, but the latest versions with the new GUI so far performed flawlessly.
But in any case, it would be nice if we could detect possible errors without playing each file from beginning to end.
A quite safe (though not perfectly 100%) way of checking comes
with MKValidator. It is a command line tool, can check many files at
once, and delivers a log to a text file. The log may show
many warnings, but only "Err" listings are of interest. Then you can be
sure the file has a problem.
You need to run the app from a command line, or you use a simple batch
file like this:
FOR %%f in (*.mkv) DO (
echo %%f
echo %%f >> log.txt
C:\PortableApps\mkvalidator\mkvalidator.exe --quiet "%%f" 2>> log.txt
echo ----- >> log.txt
)
echo on
It assumes MKValidator to be present in C:\PortableApps\mkvalidator\. Copy the above text into a text editor and save it to your video files folder as. e.g., "mkvalidator.bat". Run this to check the files, and view the result in the file log.txt.
Yet, this is still not perfectly safe. Any of the processing steps could do something wrong. You should therefore always also play any single file for a check of the beginning, middle and end, if the audio is there and synchronous.
Cutting MKV
Sometimes you may want to cut an MKV file, e.g. also after compressing.
There is no really working free app for this (one perhaps, named
MKVcutter, but it did not yet work for me).
If you don't mind cutting at key frames only, you may use AVIdemux: set
all formats to copy, output to MKV, use the cut controls, and save your
file.
MKV files also support chapters (although hardly any player supports them). The chapter format however is complicated. If you want to just add chapters every some minutes for navigation, you can do this:
- Download these prepared chapter files with 99 chapters in 1, 2, and 5 minutes intervals.
- Edit the desired file: delete all chapters exceeding the play length of your video (not mandatory but tidier; it may be a good idea to prepare several different chapter files for the most common video durations).
- Open the file in the 'Global' tab of MKVtoolnix.
- Start multiplexing. The chapters will now be included.
Jobs (batch multiplexing)
If you chose "Add to job queue" instead of "Start muxing", you can setup more multiplexing jobs and have them executed later (or overnight). After creating the jobs, select "Muxing - manage jobs" from the command bar and take care to delete old jobs if necessary (they are all kept even after execution, so you have to do the housecleaning yourself).
BluRay (basic)
The result from method 2 with the above settings can be compiled to a simple Bluray.
We need the .264 video stream and an audio stream. The separate audio file we we get by extracting it from the mkv, with MKVextractGUI. If the source is a DVB recording, it may be necessary to fix the audio file before further use. Bluray doesn't accept mp2 sound. AC3 works both for BluRay and DVD. If your video has no AC3, you may want to re-encode the soundtrack using BeLight.
- One option for BluRay making is EasyBD lite: This program can generate a simple Bluray file structure including chapters, that can be burned or used from a harddrive. The free version can even create several tracks, but no menu.Click here to download prepared chapter text files with 2- and 1-minute chapter intervals (delete chapters exceeding the video end).
- Even a bit simpler to use is TSmuxeR. Among other functions, it also has an option to generate Bluray structures. Loading files (audio and video streams is self-explaining, and so is the Bluray function:
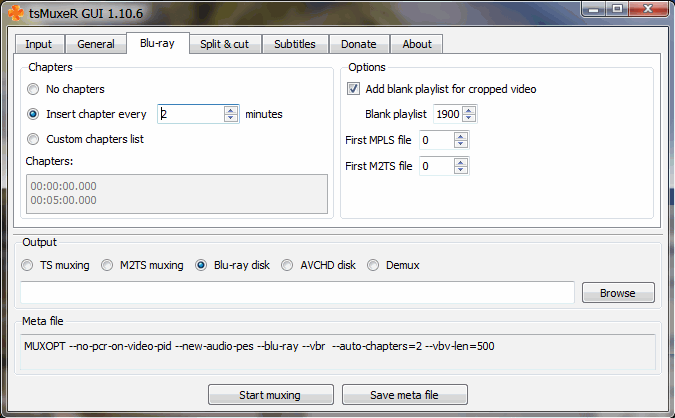
Especially convenient here is the automatic chapter insertion.
BluRay menus
Freeware for Bluray menus is rare. If you just want to combine titles on a physical BluRay disk, you can do this:
Make a simple BluRay structure from each single video, using one of the two above programs.
multiAVCHDcan generate a
single BluRay from them. It auto creates quite fancy
menu structure fully automatic. The main problem here is to verify what
you get, before burning: there is no free software player supporting
BluRay menus, and the commercial ones usually won't play files from a
harddisk. Another problem: in my tests, most of the menu icons
generated from the video content contained some garbled color
patterns instead of images.
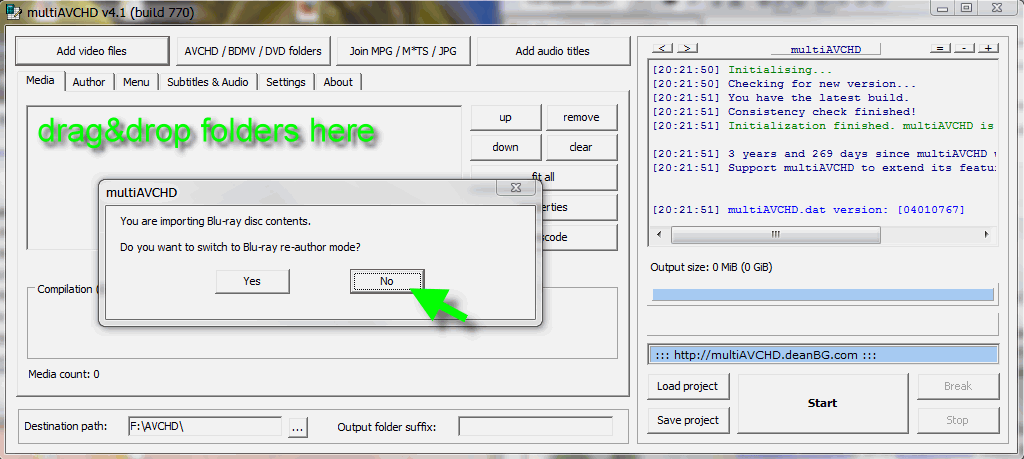
Do NOT use the button "AVCHD/BDMV/DVD folders"; It will start reading all of your harddisk.
Instead,
just drop your BluRay folders into the media area. Always a prompt will
appear if you want to switch to authoring mode. Say NO.
You can add several Bluray folders. In the Author tab, you may want to check "create top menu". When done, press "Start".
multiAVCHD will now create the combined BluRay structure. Be aware that creating the menus, which occurs at last, may take more time than the actual multiplexing. Wait until the program really says "ready" (it may appear to do nothing in the menu creation phase but it's still active).
Playing BluRay
Programs able to open
a
folder with a Bluray structure in it (no menus) are, e.g., VLC Media Player
(you may probably want to use the portable
version), and DVBviewer. Both are ignoring the chapters. MPC-HC
latest version opens folders and even supports the chapters.
DVDfab Media Playeris
payware but plays menus and comes with a thirty day test period for
the menu functions, so you can test thoroughly if it meets your
expectations (very new software may have some bugs). Unlike other
payware, it plays BluRay files from
folders. Even if you don't buy it after the test period, a rudimentary
menu fuction remains that lets you select titles and have a look at the
(then non-functional) menu screens.
For players not supporting folder playback, an ISO file can be generated with Folder2ISO and mounted with VirtualCloneDrive. With this, they (hopefully) should appear to any software as a regular Bluray drive.
Conclusion
If you want to keep your recordings on harddisks, MKV may be better than BluRay. Nevertheless even then, encoding video and audio in a BluRay-compatible way may be a wise choice.
Compiling a BluRay structure is only necessary if you want to burn your own disks. In this case you may also consider some payware solutions. But beware, these programs do not always justify their price (some cannot cope with raw h.264 streams, many insist in re-encoding the video, and some try to be easy but instead are just confusing).
Copyright
(C) 2012-2015; all
rights reserved. All
materials in these pages are presented for scientific evaluation
of video technologies only. They may not be copied from here and
used for entertainment or commercial activities of any kind.
We do not have any relation to and do not take any responsibility
for any software and links mentioned on this site. This website
does not contain any illegal software for download. If we, at
all, take up any 3rd party software here, it's with the explicit
permission of the author(s) and regarding all possible licensing
and copyright issues, as to our best knowledge. All external download
links go to the legal providers of the software concerned, as
to our best knowledge.
Any trademarks mentioned here are the property of their owners.
To our knowledge no trademark or patent infringement exists in
these documents; any such infringement would be purely unintentional.
If you have any questions or objections about materials posted
here, please e-mail us
immediately.
You may use the information presented herein at your own risk
and responsibility only. We do also not guarantee the correctness
of any information on this site or others and do not encourage
or recommend any use of it.
One further remark: These pages are covering only some aspects
of PC video and are not intended to be a complete overview or
an introduction for beginners.