DVD
Encoding
Cleaning
Deshaking
CCE
encoding Tests
MPEG2 encoder
resolution tests
Authoring
IFOedit
DVDstyler
- easy menus and portable
GUI
for dvdauthor, free and versatile
Correcting
source problems
TMPGEnc
DVD Author (1.5)
Dual
Language DVDs with TMPgenc1.5
DVD
capacities
Encoding video for DVD (MPEG2)
This topic is handled in the MPEG2 page.
Authoring DVDs
Basic DVD authoring is just making menus (assumed your movie is already cut, of course).
I've done tests with several softwares, but only a few got into closer selection:
DVDlab is a very flexible tool, due to its special approach to authoring, but also pretty hard to learn. Meanwhile, I found the time to test it but I could not get through to real results because it pretended to make a DVD folder but created only VOB but no IFO files and then crashed when trying to burn. As it is so time consuming to use, I did not do further tests. Meanwhile there are several freeware programs way better than necessary for private use.IFOedit is more of a tool for final finishing and such, but if you just want to make a DVD with one or more sound tracks but no menu (one that starts playing when inserted), IFOedit can do the entire job easily (freeware).
Simply select DVD authoring, add your
(demuxed; MPEG2CUT2
can do this) video and one or almost any number of audio files,
and tell it to go ahead.
What would be nice if the DVD had chapter to quick navigate it.
IFOedit expects you to provide a text file containing frame numbers,
then it will insert chapter marks in its output. You may us Excel
for example, make a list of numbers and export it plain ASCII
to make such a text file. One second equals 25 frames in Europe
and 30 in the US. Here are some prepared
text files for chapters every 1,2,5, and 10 minutes. Note
that 99 chapters are maximum in any DVD title.
When the DVD is finished, open the IFO files generated, again with IFOedit, check if the aspect ration is set correctly (4:3 or 16;9) and give the sound tracks their correct language tag.
DVDstyler - easy menus and portable
DVDstyler portable is probably the easiest-to-use software if you want to do a little authoring, it is freeware, and it has lots of features. Best of all, it runs without installation, from a USB stick for example. Multiple title sets, multi audio etc. are possible, so it allows for pretty complex DVD designs. The only drawback I've seen so far, there is no utility in it to grab pictures out of video files for the menu design (dragging a video into the menu just makes a picture of the first frame), and chapters need to be defined as numbers. Anything else is quite intuitive. There are several descriptions and a manual linked at the DVDstyler website so I won't repeat these things here. As to reliability I can't say much, as I have just tested it a little bit so far.
GUI for dvdauthor, free and multi-audio
GUI for dvdauthor is a user interface for the freeware 'DVDauthor' project that allows to use most of its features at ease.
For quick DVD making, GUIdvdauthor is the absolute winner, as you just chose your files, tell it to make some chapters automatically, drag the videos into the screen to make buttons, and off you go, making a DVD with title sets and all.
This software has a huge lot of features, and even an automatic chapter generator and a utility to grab frames for styling. A bit complicated at a first glance, but can be managed.
Important: It comes with a choice of 2 different engines, DVD
author and Muxman. In my opinion, Muxman is the better choice,
as it does not produce an intermediate file set as DVDauthor does
(taking much disk space and time, and it seems to be less picky
about errors in the audio streams. The only issue I found with
Muxman so far: auto play did not work (for DVD with just one movie
where I did not need a menu anyway), had to start the DVD manually.
But in such a case, just using IFOedit would also do the job.
Correcting source problems
Satellite recordings may frequently have defects in the audio or video streams that may cause failures at re-encoding or multiplexing.
Video problems can be addressed by cutting your sources (demultiplexed video and audio in parallel) with MPEG2schnitt. Needs demultiplexed files, which can be done with MPEG2CUT2.
Audio problems MPEG2Schnitt usually won't mend, but these can be corrected with mp3val-frontend, that even does many files at once, or if it's AC3, with Delaycut.
Very severe audio problems can almost for sure be mended by reading the file with Adobe Audition ("audio from Video" option), saving and re-encoding.
Older Software
This is kept here for reference:
Pinnacle Studio 9 had relatively complex menu options and has become much more stable in newer versions. However as said, some people have problems with the DVDs produced, and as I can't say that the menu creation with it is as straightforwrd as the edtiting (TMPGEnc DVD Author is much easier for me), I didn't do further tests.
A Look at some more professional tools revealed that they are too user unfriendly. Dissed.
Ulead DVD Movie Factory is simple, but you should avoid installing version
2.0 because it had several bugs and It installed a pack of Ligos
codecs that took Media Player hostage: Playing MPEG2 with it became
jerky or - at full screen - a slide show. I did not find a registry
hack to revert this mess.
With version 2.1 (still displays 2.0 when installing), the Ligos
encoder Issue seems to have been cured.
I recommend not to use any 2.0 installer first and update afterwards,
but to install 2.1 clean and first place.
Chapter editing is still much clumsier than in TMPGEnc but it
works. Other bugs have been cured as well. Easy for beginners:
you can simulate your DVD before burning.
If you want to feed it separate audio/video streams, the 'replace
audio' function will do this.
You cannot do motion menus, separate tracks or dual audio. What
is good and easy to create are menus with background music.
TMPGEnc DVD Author
This is about older versions (1.5), that are good but a little obsolete meanwhile as there is good and more capable freeware available. I'll keep this DVD making description here for a basic recipe however that can also be transported to other authoring tools. Newer versions also now require periodic "online validation" to work. While this activation stuff is already an Imposition with an operating system like Windows, it is totally unacceptable with single applications, and even more so if periodically repeated at haphazard. Imagine the web is down, the app wants to call home and you have to finish an important project. Imagine all your most probably several dozen legally registered applications act like this. So don't expect any more words about newer TMPGenc products here.
TMPGEnc DVD Author
(TDA) works quick and almost free of bugs. It has the best chapter
editor and even allows extensive cut editing of scenes. Making
a DVD is a few clicks and the program is absolutely stable.
From v.1,4 it also got a menu editor, so you can create your own
menu designs. It also supports motion menus and hierarchical menus.
Remaining problems: Just adding sound to a menu is complicated
(you need to encode the background picture as a video clip), and
the repeat function of motion menus and menu sounds apparently
has a compatibility problem, most motion menus work but some don't
work correctly on my stand alone player. Real One Player for example
always works with TMPGenc's motion menus, so my stand alone seems
to be part of the problem but not all, because all commercial
DVDs so far worked well.
A necessary warning:
Although TDA nags about many things, it may not warn you if it
just dumps the better part of a sat TV transmission. A tiny stream
error is enough, and the program will stop reading. You may see
this when adding chapters, but it may also happen that it shows
the right clip length, adds chapters through to the end, but finally
when making the DVD half of the clip is missing. Not warning at
all. It's not a frequent problem, but it's definitely wiser to
check the finished DVD thoroughly before deleting the source files
!
Here
are some first steps with TMPGenc DVD Author 1.5:
BTW, the fastest way to find the right chapter cuts and thumbnail pictures, is VirtualDub on the source videos . Just write down the frame numbers.
The example project consists of several TV recordings, with the objective to make a DVD with menus and chapters for easy access. All clips had originally been captured in MJPEG and converted to DivX4 some time ago . One was even encoded to DIVX4 interlaced as it was. The videos were expanded to MJPEG (Q=18), PCM audio, letterboxed to 720x576 frame size, to make them work with CCE encoder. Encoding was done with the same parameters as recommended for DV above, only bitrate was 2500 kbps for the 16:9 clips and 3500 kbps for one (partially) full frame interlaced clip. About 3:20 hours fit on the DVD without any further degrading of quality compared to the source. The interlaced parts now played back clean for the first time.
Now here we go:
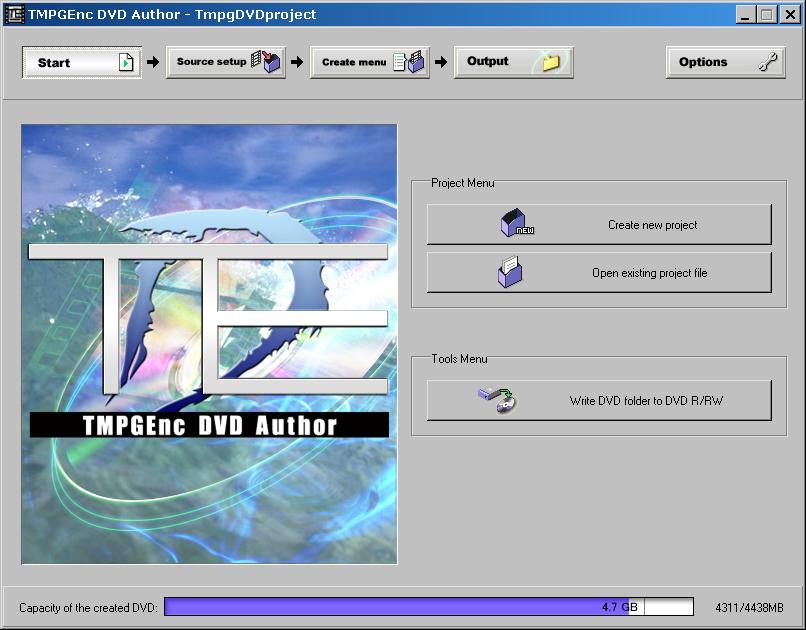
First, we will create a new project.
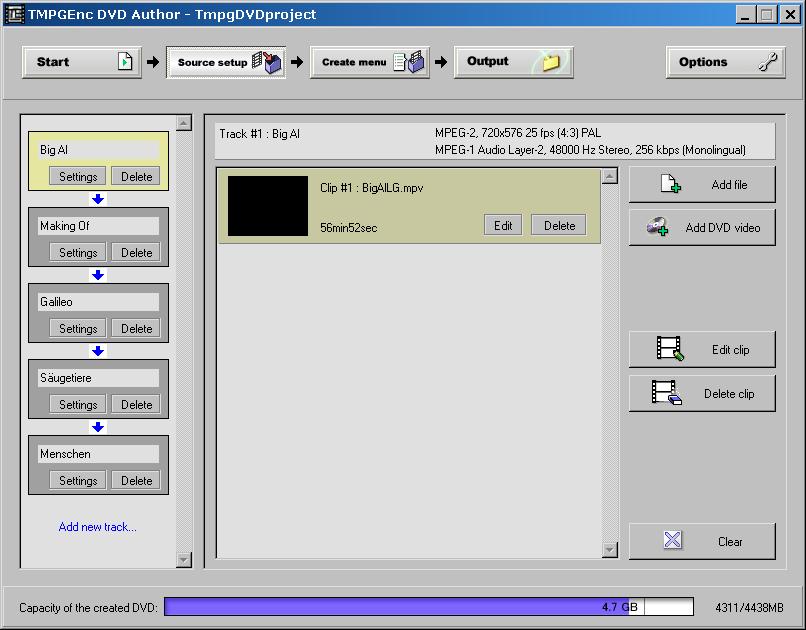
Here we have already opened 5 video files. For each one, we have Added a new track, then pulled the video into the track. This way we get a hierarchical menu structure because each track will have its own menu page.
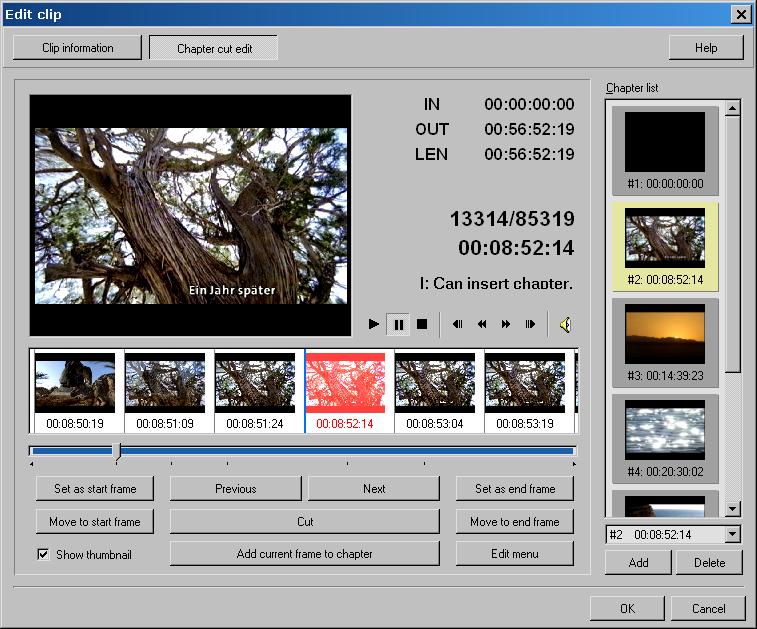
The track chapters are selected with the "chapter cut edit" function. Either search the timeline and press "Add current frame to chapter", or if you already know the frame numbers, just press "Add".
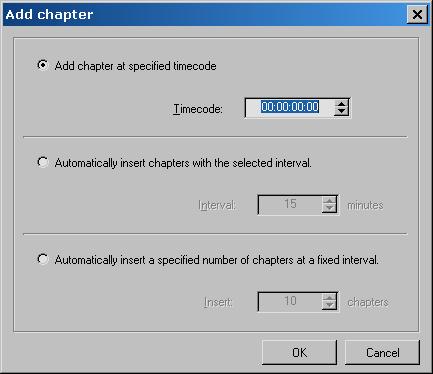
The Timecode field will also accept a frame number as input !
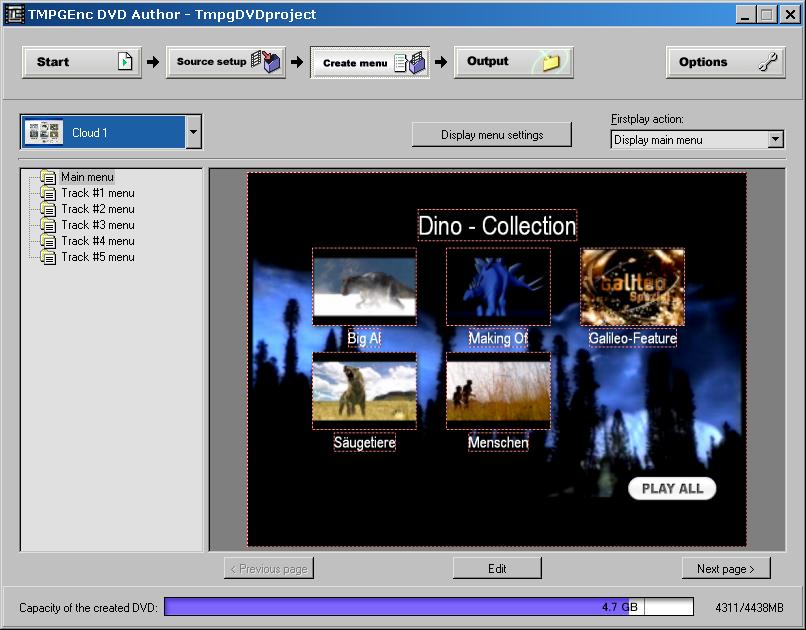
Here is the main menu. The thumbnails represent the 5 video clips. Thumbnail pictures may be changed by double clicking on the thumbnails.
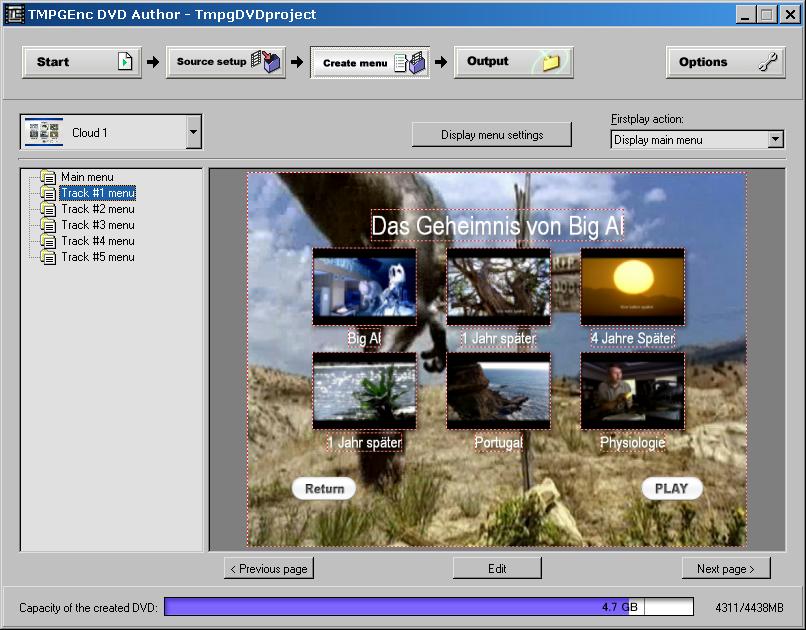
This is one of the sub menus. The background picture was exported from VirtualDub and the resized and saved as JPG with a graphics program.
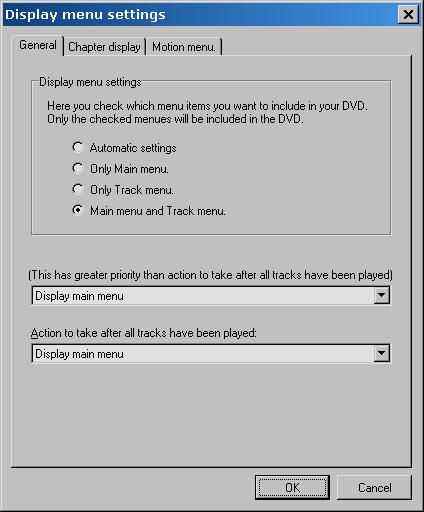
Here we have selected that both main and track menus will be generated.
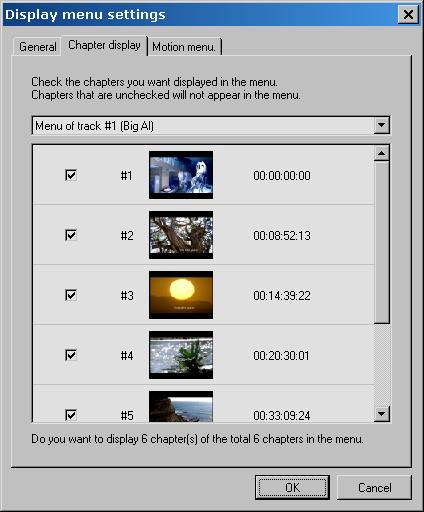
Here we can deselect some chapters from being displayed as a thumbnail. They are nevertheless still there and accessible with the seek keys. So we can keep the number of menus small but provide more entry points for fast seeking.
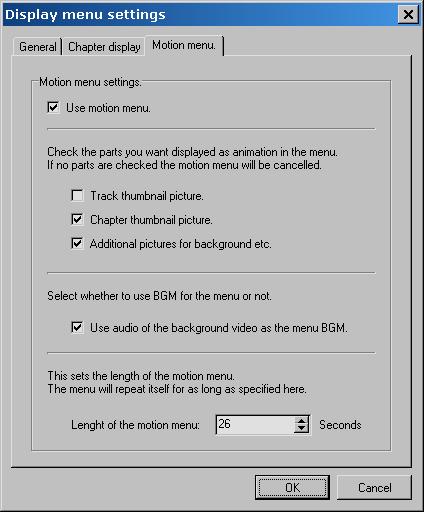
Here we selected that the chapter thumbnails will show up as little video clips, as well as the background of the main menu. Our main menu background menu has audio, by the way. It is 26 seconds long, so we select this as repeat time (the only bug I've found - the beginning of the menu clip was cut off; It would also be more convenient if the time value would be automatic in case of a video clip source).
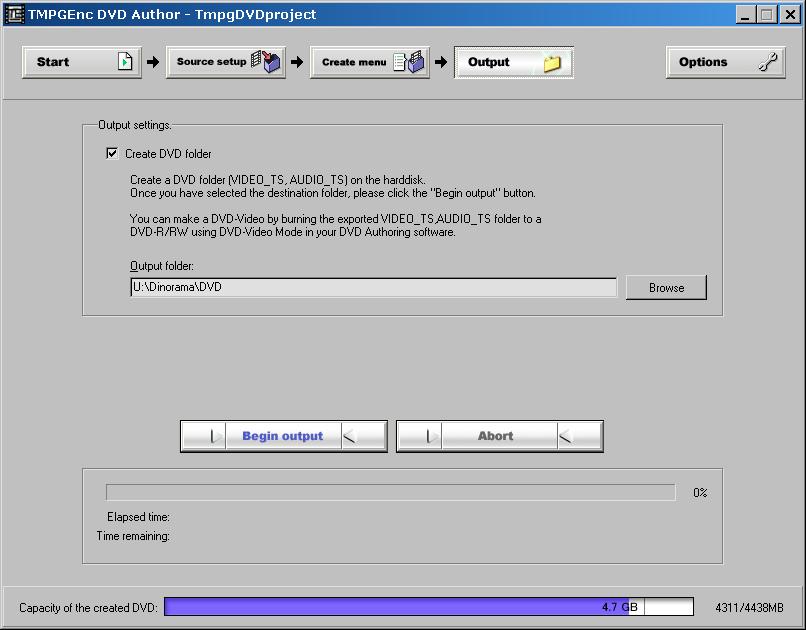
We can now create our DVD folders.
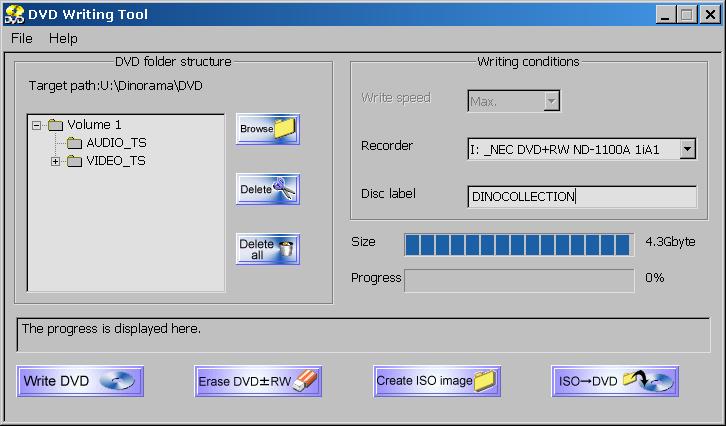
Last but not least, TMPGEnc DVD Author has an easy to use DVD burning tool.
TMPGenc DVD author up to 1.5 supports dual language only if you force it. Next I'll explain how. If you have these tasks more often, you'd better use something else: IFOedit, DVDstyler or GUIdvdauthor presented above.
TMPGenc DVD author has a mode to encode
left and right channel as 2 separate language mono channels. Good
for TV sources, but sometimes you might want to have 2 stereo
channel sets.
Also possible, in theory:
Multiplex 2 audio channels with your video, drop it into a track
of TMPGenc DVD Author, and you can use the track's settings
button to open a window that lets you set 2 stereo channels:
(Example: in this case, only one 64 kbps audio was really contained
in the source video)
It even encodes the DVD for 2
channels, also even converts mono to stereo, BUT: both languages
will be the same, e.g. the first language is used twice and multiplexed
into the VOB file as 2 additional streams. So you can switch languages
when playing your DVD, but it will always be language one that
you get.
It's quite obviously a not yet fully implemented function.
Here's a trick to overcome this:
IFOedit is a modest but powerful tool do modify DVD sets, and it even has a rudimentary authoring function. It's free and you can easily find it on the web using a search engine like google.com.
Use it this way:
First, let TMPGEnc DVD Author create
the DVD folders with audio channel modes forced to dual stereo
like described above, where desired. It will generate some dummy
audio and you don`t even have to give it both audio streams for
encoding, it won`t use the 2nd one anyway.
(DO NOT enter the source setup again after doing the track settings,
you would erase them !)
Then start IFOedit and Select "DVD Author":
Choose your video stream, then the 2 audio streams, set the language names. (If you need a tool to encode audio separately, look for Beesweet GUI, or get GermaniXencoder (alternate download)). Toolame GUI is also a good alternative, as Germanix if fixed to one bitrate.
Start DVD creation.
IFOedit will then just make a new set of VOBs together with some
basic IFO and BUP files. Of these, we will need only the main
VOBs, named VTS_01_n.VOB, (n stands for 0,1,2,...).
Replace the files in the DVD image that you authored with TMPGEnc
DVD Author with the new VOBs from IFOedit.
Last cosmetics (not necessary, but it
looks better to have language names shown in the DVD menus): Open
the IFO files that TMPGEnc created, and correct the names of the
audio channels. Leave chapter settings and all else untouched.
Save the modified IFO files and say yes to "save as BUP as
well".
DVD
capacities
Actual capacities of DVDs often lead
to confusion because somewhere they are listed in GB, elsewhere
in MB, and so on. The following table should hopefully be exact.
Note that "-R" DVDs have slightly lower capacities.
| DVD capacities | GB | MB | KB | Bytes |
| "+R DL" | 7,961 | 8 152 | 8 347 648 | 8 547 991 552 |
| "+R" | 4,360 | 4 465 | 4 572 160 | 4 681 891 840 |
| "+R mini" | 1,360 | 1 393 | 1 426 432 | 1 460 666 368 |
Copyright (C) 1998-2011; all
rights reserved. All
materials in these pages are presented for scientific evaluation
of video technologies only. They may not be copied from here and
used for entertainment or commercial activities of any kind.
We do not have any relation to and do not take any responsibility
for any software and links mentioned on this site. This website
does not contain any illegal software for download. If we, at
all, take up any 3rd party software here, it's with the explicit
permission of the author(s) and regarding all possible licensing
and copyright issues, as to our best knowledge. All external download
links go to the legal providers of the software concerned, as
to our best knowledge.
Any trademarks mentioned here are the property of their owners.
To our knowledge no trademark or patent infringement exists in
these documents; any such infringement would be purely unintentional.
If you have any questions or objections about materials posted
here, please e-mail us immediately.
You may use the information presented herein at your own risk
and responsibility only. We do also not guarantee the correctness
of any information on this site or others and do not encourage
or recommend any use of it.
One further remark: These pages are covering only some aspects
of PC video and are not intended to be a complete overview or
an introduction for beginners.