Cleaning video streams
Please note: while the following page contains many still useful hints about the basics, also consider reading the new page about camcorder->HDTV conversion dated 2015, with prodedures optimized for current hard- and software.
Cleaning analog sources
VHS
Camcorder
Hi8
Cleaning high quality footage
Best gamma
Digital camcorder tapes
The Levels filter
Frameserving
Extending VirtualDub's capabilities
Even digital sources can profit from
some advanced filtering. This especially applies to DV from consumer
camcorders, but also to many digital broadcast materials. For
digital or very good Hi8 or SVHS sources, have a look at the high quality filter page.
For older sources including even very old VHS tapes, just read
on here.
The application of choice for all filtering we do here, is VirtualDub. This
freeware application has a host of built-in and third-party filters,
especially for cleaning, that are't even remotely matched by any
commercial software. The only disadvantage, it still can't read
Directshow sources. But this can be mended, see further below.
Analog sources have several specific problems. Noise is usually stronger but is also present in digital recordings (low light conditions etc.).
Really specific for analog tape recordings are jitter, chroma noise (Flicker), chroma shift.
Jitter can best be eliminated by using
a hardware converter with an image stabilizer. I recommend analog-to
DV converters, although they may cost around 400$. You can save
that money with a digital camcorder that has an analog-to-DV function
built in (most better Digital8 models have this). If you combine
this with ScenalyzerLive, you can be sure to get the best capture
quality possible.
Just using an analog capture card has two disadvantages: some
edge noise (timing errors) will remain, and most capture programs
will probably drop some frames even with a Terahertz CPU.
I recommend to filter with VirtualDub
and save to DV again if disk space is available, and to use a
good DV codec (like MainConcept). Other intermediate storage formats
(like PIC MJPEG at Q=20 or Huffyuv) are also OK. VirtualDub can
also frameserve to CCE, but you spend the filtering time twice
for a 2-pass encoding, and the frameserver itself eats up some
CPU power, so encoding may take 4 times as long or even more.
Frame serving however is very easy here:
Install Auxsetup.exe that come with VirtualDub (Aviproxy is not
necessary). With video output set to uncompressed, start the frameserver,
let it have any name, and save anyname.vdr. Then, the .vdr-file
can be drawn right into the CCE Window.
If you want to filter and save to a DV file with the MainConcept
DV codec, be sure never to use the "fastest" setting
of the codec, this would result in some nasty artifacts.
For average VHS recordings (not SVHS or Hi8, covered below), with also a bit noisy reception, the following basic VirtualDub filter set proved OK (this is a very basic filter set requiring not too much processing power. For more advanced tricks, see the section on 8mm analog tape afterwards, which also applies to VHS tapes):
(Deinterlacing is not an issue here, because we encode for DVD).
First is the VHS filter, only for chroma shift (the vertical value is OK for most sources; double it for 2nd generation copies. The horizontal value has to be experimented). The other functions are omitted because this filter would then be very slow.
Next comes the Chroma noise filter, which eliminates color flicker that can be very intense especially with dark, saturated colours. A little luma noise reduction is also set here. This filter sometimes leaves faint color traces behind moving objects, that stick in place for several seconds. I guess it's a problem with numerical accuracy. The effect is not always visible, it mainly affects material with already low quality. With most videos, I saw no adverse effects and the advantages are overwhelming.
The temporal smoother does some further noise reduction, without reducing crispness, especially effective for transmission noise.
An alternative to the above filter set
is to use temporal smoother only (at 5 or 6) and to omit the chroma
noise filter. This is works faster. It is only for sources however
that don't have too much color flicker.
The levels filter may be used to correct gamma values, as many
VHS sources look too dark or too bright, due to calibration errors
in the analog signal processing.
For digital or very good Hi8 or SVHS
sources, have a look at the high
quality filter page.
For older and less ideal sources, just read on.
Here are some fairly sophisticated filter sets that I have experimented with over 20 hours of 8mm. Hi8 and Digital8 tapes, all converted/captured in DV format. These settings are OK for my equipment, and should be changed here or there for other hardware.
This is by far not all that can be done
with filtering. There is a very good deshaker by Gunnar Thalin,
that may do magic to old tele shots. I have written a special page on this and the results are excellent
so far concerning still and tele shots, the most annoying parts
if not stabilised.
I've however not yet found a universal setting to use in entire
tapes without manual interference.
Deshaking should of course be done before any crispening
or temporal smoothing/cleaning, so if this is still due, best
keep the unfiltered sources until the issue is entirely resolved.
8mm analog (and advanced VHS) filter track
The entire filter set could look like this:

Pretty complicated indeed and also quite
slow, but very well optimised:
The 2 instances of Exorcist correct for (small) edge effects,
the HSV filters are necessary to correct brightness for Exorcist,
about 5% additional color are attached because my 8mm pictures
were all a bit pale, general convolution and Xsharpen are for
more sharpness, VHS, corrects color displacement, temporal smoother
kills noise an flicker, and due to the large chroma noise of standard
8mm, chroma noise reduction is quite necessary. If computing time
is crucial, you may first omit temporal smoother. The Exorcist filters and chroma displacement
are very equipment dependent and have to be experimented. You should check if there is not too much loss
of detail because the Exorcist works on all levels of contrast
and edge ringing may sometimes only appear at very high contrast
edges. I would also recommend to alwas watch the results on a TV,
and in a proper vieweing distance of 5x picture hight (3x at least).
Viewing closely on a PC screen may be very misleading.
If tapes are good, have a look at this high quality filter set.
Here are the filters whose setting are not obvious from the list:

The general convolution filter is used here for a horizontal crispening, e.g. compensating the frequency response of an average video player. Vertical crispening is normally not necessary, because of the image structure (horizontal scan lines).
With low light shots (noisy ones), it may be advisable to raise Xsharpen's treshold to 64 and perhaps to omit the general convolution filter, in orer to avoid increasing noise !

For Hi8, the filter set is simpler. Chroma noise is lower due to the more robust color subcarrier of this system, so this filter can be eliminated. Temporal Smoother is enough.
Here is the entire set:
VHS is equal to 8mm, the convolution filter is less strong:
With low light shots (noisy ones), it may be advisable to raise Xsharpen's treshold to 64 and perhaps to omit the general convolution filter, in orer to avoid increasing noise !
Here, the VHS filter is not necessary
any more (no color displacement), however Temporal Smoother is
still of advantage, because D8/DV also have noise, which originates
from the camera chip and analog preprocessing.
The set looks like this:
General Convolution like with Hi8:
With low light shots (noisy ones), it may be advisable to raise Xsharpen's treshold to 64 and perhaps to omit the general convolution filter, in orer to avoid increasing noise !
Here are some examples how these filters work (source: 8mm analog tape, 10 years old).
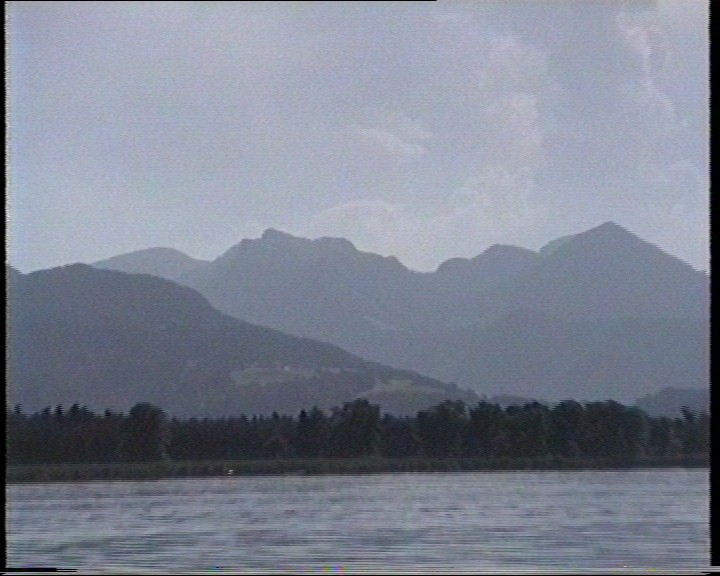 Before:
Grain and blurred treetops.
Before:
Grain and blurred treetops.
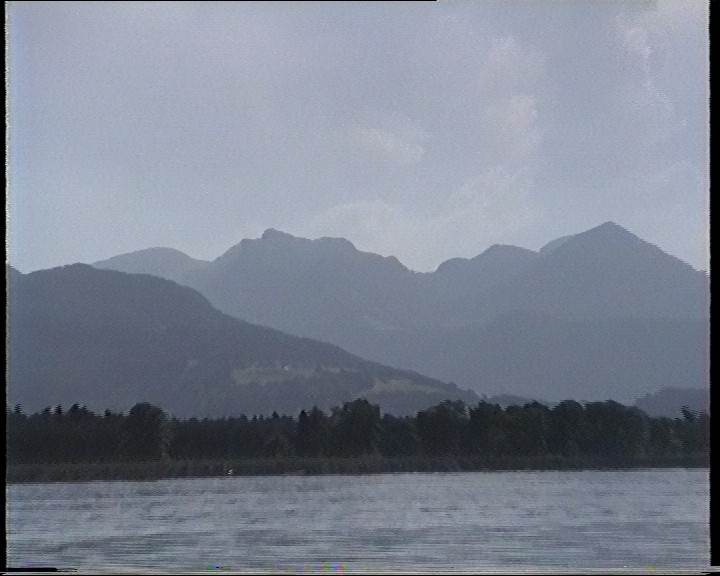 After
filtering: Sharper and cleaner. The moving picture is even more
different, because the noise in the unfiltered version is not
static.
After
filtering: Sharper and cleaner. The moving picture is even more
different, because the noise in the unfiltered version is not
static.
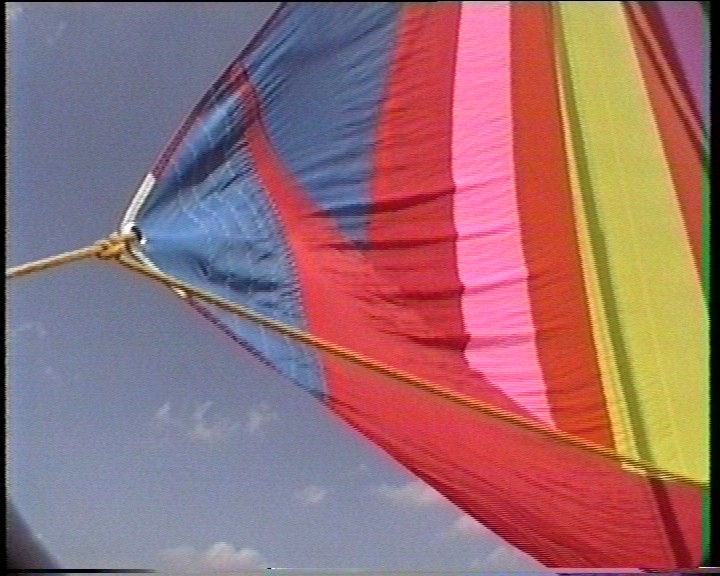 Before:
Unsharp, grainy, color displaced.
Before:
Unsharp, grainy, color displaced.
 After
filtering: Visibly better but without any increase in noise. On
a TV, this looks 100% crisp and clean even in spite of the remaining
color bleeding due to the low color signal bandwidth of the source.
After
filtering: Visibly better but without any increase in noise. On
a TV, this looks 100% crisp and clean even in spite of the remaining
color bleeding due to the low color signal bandwidth of the source.
Note that this is interlaced material.
The
filter settings shown here are certainly not good for all and
everything.
For crispening, there are several alternatives, such as the Warp
Sharp filter (use this cautiously, max. value about 30, because
it can blur fine detail).
With noisy material, like low light shots, several parameters
should be changed.
Do some tests on your own in any case.
The Levels Filter (adding that 'pro' look)
Vitualdub 1.6 has a filter called "levels",
that allows to do gamma correction. This can be used to brighten
shadows without affecting white and black levels.
What it's good for:
If you wathch professionals shooting scenes, you may notice that
they take a lot of care for correct lighting, especially avoiding
shadows in faces and hard contrasts.
Amateur shots tend to have just these errors. There is usually
little that can be done about it when recording, for obvious reasons.
Applying some levels filter, with an
input middle value of about 1.25, works wonder with these problems.
Sometimes, up to 1.80 may be appropriate.
As overall contrast get a little lower with this, so does color
contrast, so it is advisable to add some saturation, for example
10% with the HSV filter.
Just try it, it will give most of your
shots a better, more 'professional' look.
Click here for some
results and the detailed filter settings.
Frameserving: VirtualDub can directly frameserve to some applications, e.g., Cinemacraft MPEG2 encoder (CCE).
To enable frameserving: Install Auxsetup.exe that comes with VirtualDub (Aviproxy is not necessary). With video output set to uncompressed, start the frameserver, let it have some name (which, doesn't matter at all), and when prompted save anyname.vdr. Then, this .vdr-file can be opened by the other application.
Hint: Frameserving does not change field order, so make to use the righ interlacing settings with the encoder: For DV files, "offset line" 1 in CCE ot "bottom field first" in some other applications. For any 'normal' videos, from TV etc. the right settings are "offset line 0" respectivley "top field first". If this is set the wrong way, playback on a TV gets pretty jerky.
Many applications cannot read .vdr files. Sometimes it helps to give the file another name extensoion, hence, ".avi".
If this doesn't help, then introduce a second serving step. Provided you have AVIsynth installed, make a small sript like this (modify the paths according to your needs):
Videoclip=AVIsource("f:\video\anyname.vdr")
ConvertToYV12 (Videoclip)
Extending VirtualDub's capabilities
Originally, VirtualDub cannot read MPEG2, MPEG4 and some other special formats. There are special versions of it as VirtualDubMPEG2, VirtualDubMod etc. that may help in these cases.
A more current method, and one that is really recommendable, is installing fccHandler's plugins for various formats. More on this in the hdtv page and the mpeg2 page.
Another method is to use AVIsynth as a converter: A simple script like
Videoclip=Directshowsource("D:\clip.mp4")
return(Videoclip)
will for example read an MPEG4 file named "clip.mp4"
from drive D: and deliver it to VirtualDub. All you need is to
install AVIsynth, save the above script as "script.avs"
with a text editor (or with AVSedit that you will also find at
the AVIsynth site) and open "script.avs" with VirtualDub.
This trick works with any video file format that you have installed
the DirectShow codecs for (typically anything you can play with
Windows Media Player). It extends VirtualDub's capabilities to
DirectShow sources.
Of course, AVIsynth itself could do anything that VIrtualDub can
do, sometimes a little more, but it has only a scripting interface.
As with modern programming environments writing a GUI is not any
more difficult than writing a script parser, this is quite strange.
Not the easiest tool for beginners at least.
But
there is a big disadvantage: Directshow filters that AVIsynth relies on
are very sensitive to stream errors and will often crash when reading
files from DVB recordings. The VitualDub plugind mentioned above are a
lot more robust.
Copyright (C) 1998-2012; all
rights reserved. All
materials in these pages are presented for scientific evaluation
of video technologies only. They may not be copied from here and
used for entertainment or commercial activities of any kind.
We do not have any relation to and do not take any responsibility
for any software and links mentioned on this site. This website
does not contain any illegal software for download. If we, at
all, take up any 3rd party software here, it's with the explicit
permission of the author(s) and regarding all possible licensing
and copyright issues, as to our best knowledge. All external download
links go to the legal providers of the software concerned, as
to our best knowledge.
Any trademarks mentioned here are the property of their owners.
To our knowledge no trademark or patent infringement exists in
these documents; any such infringement would be purely unintentional.
If you have any questions or objections about materials posted
here, please e-mail us immediately.
You may use the information presented herein at your own risk
and responsibility only. We do also not guarantee the correctness
of any information on this site or others and do not encourage
or recommend any use of it.
One further remark: These pages are covering only some aspects
of PC video and are not intended to be a complete overview or
an introduction for beginners.